- Model: PSP Slim (PSP-2004)
- Battery: PSP-S110
8B or less. If you have a newer PSP or a PSP-3xxx, you will most likely have a TA-88v3 mainboard and destroy it by trying the things described here.PSP-S110 Pandora Battery
The original shipped battery of type PSP-S110 can be made a Pandora-battery which enables developer features on the PSP.
Opening the battery
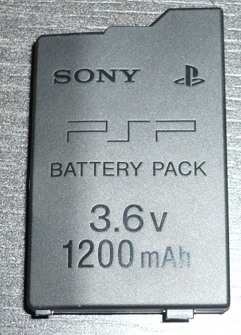
The housing of the battery is glued together around the side. DO NOT TRY TO OPEN IT WITH A SCREWDRIVER as you can easily produce shorts which may even make the battery explode or destroy it forever.
The best way is to use your fingernails and a stronger guitar pick (or something else non-conducting material).
After opening, it will look like this:
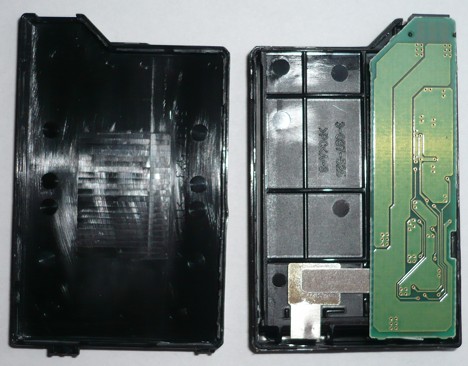
Now carefully bend over the PCB.
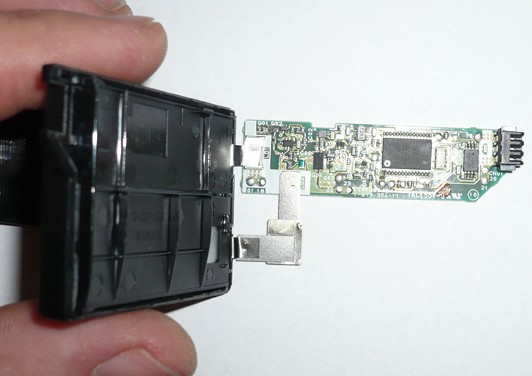
Identify target
Identify the small 8-pin IC with the label S93C56 near the IC04 printed on the PCB – this is an EEPROM which holds information about the battery. We want to stop it sending that information to the PSP.
Looking at a data sheet, we will find this picture:
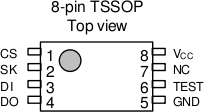
Now there are 2 ways to interfere: We can disconnect the CS pin which indicates when a new command is about to be sent to the IC or we can short the DO (data output) pin to Vcc so that there will be no readable output from the IC.
If you regularly need a Pandora battery, you can even solder a switch instead of cutting/shorting the points.
Disconnect CS
The CS line is used to tell the EEPROM when it has to listen for commands. By cutting this line, the EEPROM won’t be able to work anymore and thus you will have a Pandora battery. If you do it right, then you can undo the cut with a normal pencil (the lead in the pencil is conductive).
Find the line with the 19 printed nearby. It is the one going from the top right pin of the IC. Use a razor knife to cut it at this point (marked red):
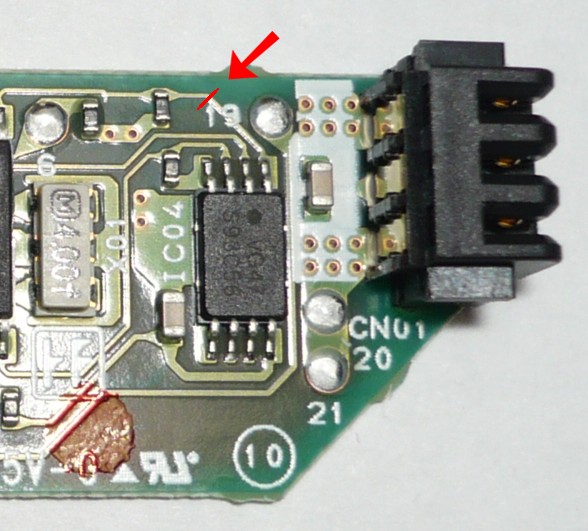
That was it! Just assemble everything back and use some adhesive tape to hold the battery together. If you put it into your PSP (with AC adaptor unplugged), the green Power-LED should automatically turn on without doing anything else.
Congratulations. You now have a Pandora battery.
Short DO and VCC
Magic MemoryStick
A Magic MemoryStick contains a special boot-code which provides means to update the firmware of the PSP. There are different tools to create one:
These are all mostly self-explanatory.
After some playing around with my 120MB MemoryStick Duo without luck, I came to the conclusion, that you really need a Pro Duo for this thing to work. The limit for sticks up to 2GB is gone. You can use any stick – mine was a 8GB MemoryStick Pro Duo Mark 2. Be sure to backup all files first.
Using PSPGrader and Rain’s UltraLite MMS Maker didn’t work in the first place (tried both with the Format MemoryStick option). The latter one gave the “IPL failed to inject” error. I then used the mspformat.exe from the TotalNewbi Installer to format the USB stick. After that, using Rain’s (without the Format option checked) finally worked and I had a Magic MemoryStick.
Using the Magic MemoryStick
To make the PSP load the custom file from the MemoryStick, you have two options:
- without the MemoryStick in the slot and without AC adapter plugged, put the Pandora battery into
- the green Power-LED should turn on, anything other stays off
- hold the L shoulder button while inserting the MMS
- now the WIFI– and M-LEDs should flicker and boot the file
you can also do it the other way around:
- without AC adapter plugged and without battery inserted, put the MMS into the slot
- hold the L shoulder button while inserting the Pandora battery
- the green Power-LED should turn on and the WLAN– and M-LEDs should start to flicker
If only the green Power-LED comes on with none of the other LEDs flickering, your Magic MemoryStick mostly doesn’t work. In some rare cases you might have a PSP with the newer mainboard (TA-88v3). Find out here. You might also try this.
Flashing custom firmware
- http://forums.gametrailers.com/thread/the-official-psp-custom-firmwa/785993?page=31
- http://www.pspmod.com/forums/psp-software-guides/45253-how-install-psp-custom-firmware.html
- Team GEN Forums (mostly French, but one is English)
- List of all CFWs incl. some background info
After using the MMS and selecting the first option Flash install 5.00M33-4, you will have Dark Alex‘s firmware on your PSP. Upgrade it to the latest version by following the steps here. Just download the 5.00 M33-5, install it as described there then do the same with the 5.00 M33-6.
Now you have the choice of switching over to Team GEN‘s firmware which should support all the latest games. To do this, use the XGen Updater as described here. The firmware file is also available here. Newer versions can then be found in the Downloads section of psp-hacks.com.
If you don’t have a backup of your saves, try this to possibly recover them.
Backup your games
- http://forums.exophase.com/showthread.php?t=4440
- http://www.stylemo.com/2007/11/06/how-to-create-iso-backups-of-your-psp-games/
After you made a backup, copy the resulting ISO file into a folder ISO on your PSP’s MemoryStick. It will then appear in the game menu under MemoryStick.