


Most tools you want to boot are probably Linux systems. To boot them, you need a kernel and some (initial) filesystem. One way is to load an initrd (initial ramdisk) which contains only the basic stuff and mounts the big filesystem itself. Or you can mount the “big” filesystem directly and use that from the beginning.
You can find my current config here. And below you’ll find detailed instructions for those tools.
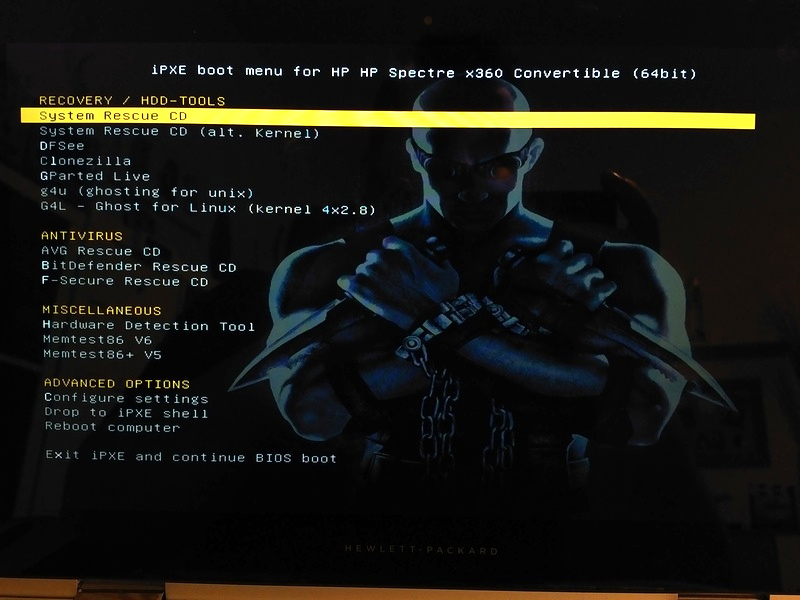
Bootstrap
For general preparation, I fill some variables with architecture relevant data, e.g. if the system is 32bit or 64bit. And to spice things up, I also have a few variables with colour codes. This is the code I use:
set esc:hex 1b
set bold ${esc:string}[1m
set orange ${esc:string}[33;0m
set yellow ${esc:string}[33;1m
set cyan ${esc:string}[36;1m
set resetfg ${esc:string}[39m
set resetbg ${esc:string}[49m
set resetbold ${esc:string}[22m
set reset ${esc:string}[0m

# Figure out if client is 64-bit capable
cpuid --ext 29 && set arch x86_64 || set arch x86
cpuid --ext 29 && set archb 64 || set archb 32
cpuid --ext 29 && set archl x86_64 || set archl i386

set chotkey ${bold}
set cname ${orange}Code language: PHP (php)
Also, ${boot-url} is the URL to my web server’s ipxe directory where everything is located.
AVG Rescue CD
To run the AVG Rescue CD, you need these files from the ISO image:
isolinux/vmlinuzisolinux/initrd.lzm
Then use this iPXE configuration:
echo Booting ${cname}AVG Rescue CD${reset}
set base-url ${boot-url}avg/
kernel ${base-url}vmlinuz max_loop=255 init=linuxrc vga=ask reboot=bios
initrd ${base-url}initrd.lzm
boot || goto failedCode language: JavaScript (javascript)
BitDefender Rescue CD
For the BitDefender Rescue CD you need to unpack the ISO image to some directory and make that available via NFS.
Also, you need the files:
boot/kernel.x86_64-efiboot/kernel.i386-pcboot/initfs.x86_64-efiboot/initfs.i386-pc
Rename them to remove the -pc and -efi suffixes, then use this iPXE config (adapt to your needs, esp. the nfsroot parameter):
echo Booting ${cname}BitDefender Rescue CD${reset} (${archl})
set base-url ${boot-url}bitdefender/
kernel ${base-url}kernel.${archl} root=/dev/nfs real_root=/dev/nfs nfsroot=172.16.254.1:/volume1/web/ipxe/bitdefender/cd/ ip=${ip} loop=/rescue/livecd.squashfs looptype=squashfs livecd.nfsif=${mac} initrd udev cdroot nosplash lang=en
initrd ${base-url}initfs.${archl}
boot || goto failedCode language: JavaScript (javascript)
CloneZilla
Download CloneZilla
as a zip package. Download both architecture versions (amd64 and i686). From the zip files, you need these files (per architecture):
live/vmlinuzlive/initrd.imglive/filesystem.squashfs— “big” filesystemlive/Clonezilla-Live-Version— version marker
Put these files into a directory x86_64 for the amd64 variant, and x86 for the i686 variant.
Then use this iPXE config (notice the ${arch} in the base-url):
echo Booting ${cname}Clonezilla${reset} (${arch})
set base-url ${boot-url}clonezilla/${arch}/
kernel ${base-url}vmlinuz boot=live union=overlay username=user config components noswap edd=on nomodeset nodmraid noeject locales= keyboard-layouts= ocs_live_run="ocs-live-general" ocs_live_extra_param="" ocs_live_batch=no vga=normal net.ifnames=0 nosplash i915.blacklist=yes radeonhd.blacklist=yes nouveau.blacklist=yes vmwgfx.enable_fbdev=1 fetch=${base-url}filesystem.squashfs
initrd ${base-url}initrd.img
boot || goto failedCode language: JavaScript (javascript)
DFSee
For DFSee the easiest way is to load the whole ISO image into RAM and boot it from there.
echo Booting ${cname}DFSee${reset}
kernel ${boot-url}memdisk iso raw
initrd ${boot-url}dfsee/dfsee.iso
boot || goto failed
#sanboot --no-describe --drive 0x00 ${sanboot-url}dfsee/dfsee.isoCode language: PHP (php)
(The sanboot line didn’t work for me for some reason. That’s why I used memdisk instead.)
FSecure
Getting the F-Secure Rescue CD to boot via the network is a bit more complicated (if you want to avoid using memdisk).
From the ISO image, you need the following:
boot/isolinux/fsecure/linux— kernelboot/isolinux/fsecure/minirt.gz— init ramdiskKNOPPIX/— folder with the remaining system files
Then proceed according to this:
- Copy the extracted
minirt.gzfile andKNOPPIX/folder to a temporary location on a linux machine (e.g./root/tmp) - In the
/root/tmplocation create a folder calledfsecureand change into this directorymkdir /root/tmp/fsecurecd /root/tmp/fsecure - Type the following command and press enter (this extracts all the files from the
minirt.gzfile)gunzip -c ../minirt.gz | cpio -idv - Copy the
KNOPPIXfolder to themnt-systemfolder (from the now extractedminirt.gz)cp -r ../KNOPPIX mnt-system - Make a backup copy of the
initfilecp init init.orig - Edit the
initfile with the following modifications- Find the
# findknoppix devices...section and delete everything from thefindknoppix()method and replace it byreturn 0
Change
- Find the
# findknoppix devices...
findknoppix(){
 local dev
 for dev in "$@"; do
  [ -b "$dev" ] || continue
  echo -n -e "\r${CRE}${BLUE}${SEARCHINGFOR} $DISTRO in: ${MAGENTA}$dev${NORMAL}   "
  trymount "$dev" /mnt-system >/dev/null 2>&1 || continue
  if [ -r /mnt-system/"$knoppix_dir"/KNOPPIX ] ; then
      # We must have also fsecure structure present else we might try to mount something wrong.
      if [ -d /mnt-system/fsecure/rescuecd ] || [ -d /mnt-system/boot/isolinux/fsecure ] ; then
         echo -e "\r${CRE}${GREEN}$DISTRO ${FOUNDAT}: ${MAGENTA}$dev${NORMAL}       "
         return 0
      fi
  fi
  umount /mnt-system
 done
 return 1
}Code language: PHP (php)
into
# findknoppix devices...
findknoppix(){
 return 0
}Code language: PHP (php)- Compress everything back into a file again by typing the following and press enter
find . -print | cpio -o -H newc |gzip -9 -c - > ../minirt.gz.new - Copy the new
minirt.gz.newto thefsecuredirectory on the web server
and name itminirt.gz - Copy the
linuxkernel to the same directory
This is the iPXE boot code:
echo Booting ${cname}F-Secure Rescue CD${reset}
set base-url ${boot-url}fsecure/
kernel ${base-url}linux ramdisk_size=100000 lang=en vt.default_utf8=0 apm=power-off vga=normal nomce loglevel=1 nolapic_timer nosound console=tty10 video=noblank
initrd ${base-url}minirt.gz
boot || goto failedCode language: JavaScript (javascript)
G4L – Ghost for Linux
For G4L extract these files from the iso image:
ramdisk.lzmabz4x2.8— kernel 4×2.8, seems to be more compatible than the others
(You can try different kernel versions if you run into problems.)
Here’s the iPXE config:
echo Booting ${cname}G4L - Ghost for Linux${reset}
set base-url ${boot-url}g4l/
kernel ${base-url}bz4x2.8
initrd ${base-url}ramdisk.lzma
boot || goto failedCode language: JavaScript (javascript)
g4u – ghosting for unix
I tried to boot g4u directly, but that didn’t work for me. So the easiest way is to load the whole ISO into RAM and boot it from there – just as if you inserted the CD.
echo Booting ${cname}g4u - ghosting for unix${reset}
set base-url ${boot-url}g4u/
#kernel ${base-url}netbsd
#initrd ${base-url}miniroot.kmod
kernel ${boot-url}memdisk iso raw
initrd ${base-url}g4u-2.5.iso
boot || goto failedCode language: PHP (php)
GParted Live
Just like with CloneZilla, you can download GParted Live as a zip file for amd64 and i686 architecture.
Then get these files from each zip file and put them into directories x86_64 (for amd64) and x86 (for i686).
live/GParted-Live-Versionlive/vmlinuzlive/initrd.imglive/filesystem.squashfs
This is the iPXE config I use:
echo Booting ${cname}GParted Live${reset} (${arch})
set base-url ${boot-url}gparted/${arch}/
kernel ${base-url}vmlinuz boot=live union=overlay username=user config components noswap noeject ip= net.ifnames=0 nosplash fetch=${base-url}filesystem.squashfs
initrd ${base-url}initrd.img
boot || goto failedCode language: JavaScript (javascript)
HDT – Hardware Detection Tool
HDT comes as a small floppy image and can be booted using the sanboot command.
echo Booting ${cname}Hardware Detection Tool${reset}
sanboot --no-describe --drive 0x00 ${sanboot-url}hdt/hdt.img || goto failedCode language: PHP (php)
Memtest86 V6
Memtest86 comes as a usb flash drive image which you can boot using memdisk.
echo Booting ${cname}Memtest86 V6${reset}
kernel ${boot-url}memdisk
initrd ${boot-url}memtest86-6/memtest86-usb.img
boot || goto failed
#sanboot --no-describe --drive 0x00 ${sanboot-url}memtest86-6/memtest86-usb.imgCode language: PHP (php)
(Again, sanboot didn’t work for me.)
Memtest86+ V5
Memtest86+ is the free and open-source alternative to Memtest86. This is distributed as a ready-to-boot binary.
echo Booting ${cname}Memtest86+ V5${reset}
boot ${boot-url}memtest86+/memtest86+.bin || goto failedCode language: PHP (php)
SystemRescueCD
For the SysRescCD, you need the following files from the ISO image:
sysrcd.dat— “big” filesystemsysrcd.md5— checksum to validate the sysrcd.datisolinux/rescue32— kernel for 32bit systemsisolinux/rescue64— kernel for 64bit systemsisolinux/initram.igz— initial ramdisk
Copy those to a directory sysresccd on your web server (where the boot.ipxe is).
SysRescCD looks for the “big” filesystem for itself. You just have to point it into the right direction with the netboot parameter.
echo Booting ${cname}SystemRescueCD${reset} (${archb})
set base-url http://diskstation:80/ipxe/sysresccd/
kernel ${base-url}isolinux/rescue${archb}
initrd ${base-url}isolinux/initram.igz
imgargs rescue${archb} setkmap=de dodhcp netboot=${base-url}sysrcd.dat
boot || goto failedCode language: PHP (php)